Move In Inspection Checklist: The Photos That Actually Matter Two Years Later
Some links here are affiliate links. If you buy through one, I earn a small commission at no cost to you — full disclosure at the bottom.
He had forty-one photographs and not one of them helped him.
This was a two-bedroom in a building I managed outside Columbus, and the tenant had done everything he thought he was supposed to do. Move-out day, unit scrubbed within an inch of its life, and he stood in the doorway with his phone out showing me picture after picture. Sparkling countertops. Vacuum lines in the carpet. The inside of an oven you could have eaten off. He was proud of it, and honestly he should have been.
Then we got to the second bedroom and there was a six-inch gouge in the drywall behind where the door swings, the kind a doorknob makes over time when there’s no stopper. He said it was there when he moved in. I believed him — that damage takes months to develop and he’d been there fourteen months. But I couldn’t do anything with “I believe him.” What I needed was a picture of that wall from the week he got the keys, and every single one of his forty-one photos was taken on the day he left.
That’s the gap this whole thing turns on, and it’s why a move in inspection checklist is worth more than anything you do on your way out. The argument at move-out is almost never about how clean you left the place. It’s about when something happened.
What is a move in inspection checklist?
A move-in inspection checklist is a room-by-room record of a rental property’s condition at the start of a tenancy. It documents existing damage, wear, fixtures, appliances, walls, floors, windows and storage areas using written notes, dated photographs and, where useful, video. Its purpose is to establish what was already present before the tenant took occupancy, so that pre-existing conditions can be distinguished from changes that occurred during the lease.
That’s the textbook version. The working version is shorter: it’s the set of pictures that answers the only question anyone actually asks at move-out. Some landlords hand you a paper form for this on day one, and if yours does, fill it in — but the form on its own is a list of checkboxes and a signature. What gives it weight is the images sitting alongside it.
Everyone documents at the wrong end
Think about what a move-out photo actually proves. It shows the condition of the unit at the moment you left. Fine. But nobody’s disputing that — I’m standing right there looking at it. The thing under discussion is whether the mark on the wall arrived with you or was waiting for you, and a photo from your last day is structurally incapable of answering that.
A photo from your first day answers it instantly. The first day is chaotic and the last day feels significant, so people put the effort in the wrong place. That’s all this is.
I want to be clear about what I do and don’t know here. I managed buildings, I didn’t practice law, and the rules around deposits change from state to state in ways I never fully tracked. What I can tell you is how the conversation goes when you’re standing in an empty unit with a clipboard, because I had that conversation a few hundred times. And in that conversation, the tenant with a dated photo of the wall finished the discussion in about eight seconds. The tenant without one was into a negotiation.
The part nobody warns you about
Here’s what I saw more often than missing photos, and it’s the thing that made me want to write this: people took the pictures and then couldn’t find them.
Fourteen months, twenty-two months, three years. In that stretch you get a new phone. Your cloud storage fills up and you dismiss the warning six times and then it silently stops backing things up. You take eleven thousand other photographs. The move-in pictures are technically still somewhere, buried in a camera roll between a dog and a parking sign, and when you actually need them you scroll for four minutes, get frustrated, and give up.
Or worse — and I watched this happen twice — they send the photos to themselves through a messaging app, or screenshot them to crop something, and the file that survives has a timestamp from the day they forwarded it, not the day they shot it. Which makes it useless for the one purpose it existed for.
So the honest version of this job has two halves. Taking the pictures is the easy half and every guide on the internet covers it. Being able to produce them in twenty seconds two years later is the hard half and almost nobody mentions it.
A two-minute test you can run right now
Can you find your own move-in photos?
- Open your phone’s photo app and search for the month you moved into your current place. Most galleries let you jump to a date. Give yourself two minutes, no longer.
- If you find something — check the date. Tap into the photo details. Does it show the actual date it was captured? If the image has been screenshotted, forwarded, or re-saved somewhere along the way, the original capture date may not have survived.
- If you find nothing, or find three blurry shots of an empty living room — that’s the normal result. It’s what most people get, including me the first time I tried it in my own apartment.
If you’re already living somewhere and that test went badly, you haven’t lost as much as you think. Photograph everything today anyway. A picture taken in month nine still establishes that a mark existed before month twenty-two, which narrows the conversation considerably even if it doesn’t end it. And if you’re reading this before a move, you’re in the best possible position — you get the clean version.
What people miss: a move in inspection checklist by zone
These are the areas that came up over and over in walkthroughs, ranked by how often an undocumented problem there turned into a real deduction. The pattern is consistent: people photograph what’s easy to see and skip what requires opening something or moving something.
| Zone | What people skip | Why it comes up later | Risk if undocumented |
|---|---|---|---|
| Cabinet and closet interiors | Doors photographed closed | Shelf staining, liner damage, odors | High |
| Behind and under appliances | Never photographed at all | Floor damage, old leak marks | High |
| Bathroom grout and caulk | One wide shot deemed enough | Discoloration reads as neglect | High |
| Walls above eye level | Only shot at standing height | Old anchor holes, shelf brackets | Moderate |
| Floor edges and thresholds | Center of the room photographed | Wear starts at the perimeter | Moderate |
| Window frames and glass edges | The view gets shot, not the frame | Existing chips, seal failure, condensation staining | Moderate |
| Door faces and hinges | Forgotten entirely | Knob dents, scuffs, sagging hinges | Low |
| Blinds, screens, hardware | Assumed to be background | Bent slats and torn screens are itemized | Low |
That window row connects to something worth knowing if you’re planning any changes to your glass: existing edge chips matter far more than they look like they should, and I went into why in the piece on window film and thermal stress cracks. Photograph the frames now regardless.
What should you photograph when moving into an apartment?
Photograph every room before any furniture comes in, starting with wide shots from each corner and then moving to close-ups of specific flaws — but always capture a mid-range shot first so each close-up can be located in the room. The areas most often missed are cabinet interiors, the space behind appliances, bathroom grout, and window frames. The step that matters most is what happens afterward: back the photos up the same day without re-saving or forwarding them, and store them in one clearly named folder you’ll still be able to find years later.
Do you need to buy anything?
Most of this is a phone and forty-five minutes. But three specific problems come up enough that a small purchase genuinely solves them, and one popular category I’d steer you away from.
Clip-on wide-angle phone lens
Try photographing a rental bathroom sometime. There’s nowhere to stand. You back up until your shoulders hit the door and you’ve still only got two thirds of the room, so you take four partial shots that don’t assemble into anything in anyone’s head. And a bathroom is one of the highest-deduction rooms in the unit.
A clip-on wide lens gets the whole space in one frame, which is what makes it useful as a reference later — a single image where the sink, the floor, and the grout line are all visible in relation to each other. The distortion at the edges is noticeable and slightly ugly. That doesn’t matter here. You’re not shooting for a portfolio.
Listings advertise a degree figure — 120°, 140°, whatever — and I’ve never found those numbers to mean much across brands. Check that the clip actually clears your phone case, which is the failure people report most.
Check price on AmazonMove-in inspection apps and subscription report services — no link here
I’m raising this second, before the useful stuff, because it’s the option most people find first and it looks like exactly the right answer. There’s a whole category of apps that walk you through a unit room by room, let you tag photos, and generate a tidy PDF condition report at the end. Some of them are well made. The organization they impose is legitimately better than a folder of loose images.
So why not. Because the entire point of this exercise is having something retrievable in two years, and these run on subscriptions. Your access depends on that company still operating, still supporting your account, and you still paying — across a stretch of time when you may well have moved twice and forgotten the app exists. An archive locked behind a lapsed subscription hasn’t solved the retrieval problem. It’s handed it to a third party whose incentives aren’t yours.
A boring folder in a cloud account you already use and already pay attention to is less impressive and considerably more durable. That’s the whole argument, and it’s why I’m not putting an affiliate link on this category even though it would convert well. The standard I set for this site was that I don’t link to something when I think the underlying model works against the reader’s actual goal.
If one of these apps lets you export everything as plain image files that you keep, that changes the calculation and I’d use it. Check the export function before you trust it with anything.
No affiliate link on this option — see abovePortable LED work light
Nobody plans to move in after dark. Then the truck runs late, or the utility transfer didn’t go through, and you’re standing in an unlit apartment at nine at night with a phone in your hand.
Don’t photograph it with the flash. Flash flattens everything — it hides depth and washes out precisely the kind of shallow surface damage you came to record. A scuff that’s plain in daylight simply isn’t there under direct flash. A rechargeable LED panel costs about what dinner costs and solves it. Point it at the wall from an angle rather than head-on: raking light across a surface throws dents and texture changes into relief in a way flat light never will, and that’s worth knowing even in a bright room.
Runtime claims on these are quoted at the lowest brightness setting, which nobody uses. Assume you’ll get considerably less at a level bright enough to photograph by.
Check price on AmazonFolding phone tripod
One reason to bother: repeatability. Shoot your wide room shots from a stand at a fixed height and you can set it up in the same spots at move-out, which makes the two sets genuinely comparable instead of roughly comparable. Skip it if money’s tight. Nothing here breaks without it.
Phone clamps on cheap tripods loosen after a few dozen uses. Not a problem for a job you’ll do twice, but don’t expect it to survive as a general-purpose stand.
Check price on AmazonThe walkthrough, in order
Do these in order. A couple of them lose most of their value if you don’t.
- Shoot before anything comes inside. One box against a wall and that wall is gone for the next two years. This is the only genuinely irreversible step here, which is why it’s first and why it’s worth delaying the movers by half an hour if you have any say in it.
- Solve the light before you solve anything else. Daylight if you can get it — open every blind and shoot mid-morning. If the power isn’t on and it’s dark, this is what the work light is for. Don’t push through with a flash and tell yourself it’s fine. It isn’t, and you won’t know until you need the photo.
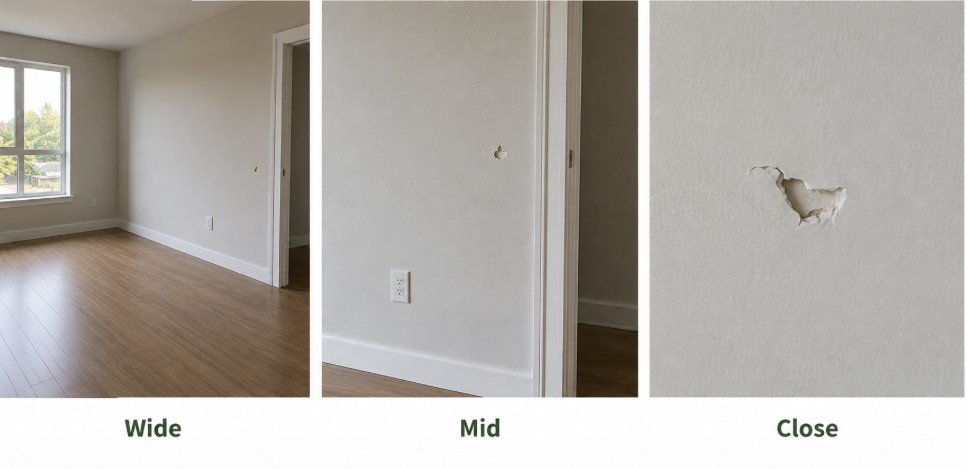
- Four wide shots per room, one from each corner. These are your map. Every close-up you take afterward gets located by reference to one of these, and without them you’ll end up with a folder of anonymous drywall.
- Work in a wide, mid, close rhythm. When you spot a flaw, take a mid-range shot showing the flaw plus a recognizable landmark — a door frame, an outlet, a corner — then move in for the detail. The mid shot is the piece people skip and it’s the one that makes the close-up mean anything.
- Open everything. Cabinet doors, closet doors, the vanity, under the sink, the medicine cabinet, the oven, the fridge including the crisper drawers. This is where the highest-risk zones on the table live and it’s where nearly everyone stops short.
- Pull what you can safely pull. If the fridge rolls out without a fight, roll it out and photograph the floor behind it. Same with a freestanding range. Don’t force anything, don’t disconnect anything, and skip it entirely if it feels heavy or stuck — a scratched floor from moving an appliance is a worse outcome than a missing photo.
- Record one continuous walkthrough video as well. Not instead of the stills — alongside. Walk slowly through every room narrating as you go, saying the room name out loud and calling out anything you notice. The video fills the gaps between your photos and the audio makes it navigable later.
- Back it up the same day, without re-saving. Cloud sync or a direct cable transfer to a computer. Do not route these through a messaging app, do not screenshot them to crop, do not run them through a filter. Every one of those steps can strip or rewrite the original capture date, and that date is a large part of what makes the file worth having.
- One folder, one obvious name. Something like 2026-08 Move-in — 412 Oak St. Write it the way you’d search for it, not the way you’d file it. Two years from now you’ll be typing something into a search box while mildly stressed, and the folder needs to surface on the first guess.
- Email the folder link to yourself. Or a handful of the key images as attachments. Your email survives phone changes, storage migrations, and cloud accounts you stopped using. It’s a second copy in a place you’ll definitely still have access to, and it costs you ninety seconds.
- Set a calendar reminder for one month before your lease ends. To shoot the same set again, from the same positions. Almost nobody does this and it’s the step that turns a pile of old images into an actual before-and-after. Put it in now, while you’re thinking about it.
If you only do four things
Two things, and then go do this
If you’re moving soon: the wide shots before the furniture arrives are the part you cannot go back and get. Everything else on this page can be done late. That one can’t.
If you’re already settled in: run the two-minute test above. Search your gallery for your move-in month. Whatever you find or don’t find is useful information, and if the answer is nothing, photograph the place this weekend and start the clock from today.
One boundary worth stating plainly — I ran walkthroughs, I’m not an authority on deposit rules, and those rules genuinely differ depending on where you live. If you end up in a real disagreement with a landlord, a local tenant resource in your area will know things I don’t.
I ran into that tenant from Columbus about a year later, at a hardware store of all places, and he’d moved into a place across town. He told me the first thing he did in the new apartment, before the truck was even unloaded, was walk every room with his phone out. He said his girlfriend thought he’d lost it.
He also said he’d found the doorstop missing in the new bedroom, photographed the bare wall behind the door, and then bought a two-dollar rubber stop and installed it himself that afternoon. Which is the better version of this story, really. The documentation is insurance. Noticing the thing that’s going to cause the damage — that’s the part that actually saves you the money.
Dana managed apartment communities in Ohio and North Carolina for five years, where part of the job was walking units after move-out and calculating what came out of the deposit. She rents now, and writes about making a rental feel like yours without paying for it on the way out. More about this site.
One Comment