Portable AC Window Seal for Renters: No-Drill Options That Come Off Cleanly
SaveTheDeposit contains Amazon affiliate links. If you buy through one, we may earn a commission at no cost to you. The option flagged in red below has no link on purpose.
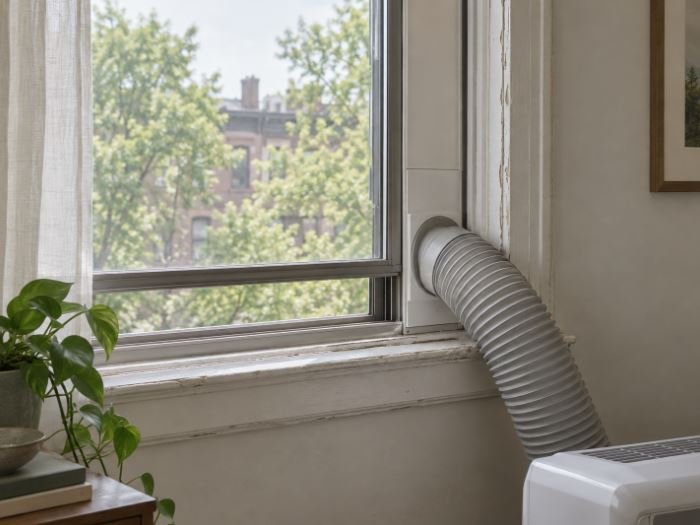
Portable air conditioners get sold to renters on a single promise: nothing gets installed. The unit rolls in on casters, plugs into the wall, and rolls back into the closet when the heat breaks. The exhaust hose still has to leave the room, though, and it leaves through a window you don’t own.
I’ve walked a lot of move-out inspections where the AC was long gone and the window told the story anyway. A gray ribbon of adhesive along the side jamb. A hook-and-loop strip someone gave up on halfway. Nobody had drilled a thing. The setup came down in ten minutes and left behind a cleanup job nobody planned for.
So this guide judges every portable AC window seal for renters on two separate days: the day it goes up, and the day it has to come back off.
Why Portable AC Window Setups Are Different for Renters
A renter-friendly portable AC window seal lets the exhaust hose vent through an existing window without drilling or altering the frame, and it can be removed at the end of the season without leaving residue behind. The realistic choices are a removable rigid panel, an adhesive fabric seal, or a pressure-fit panel, and the right one depends on your window type and how much adhesive ends up touching the frame.
Most installation guides are written for homeowners. They judge a setup by how well it seals, because a homeowner’s only audience is the thermostat. A renter has a second audience: whoever walks the unit after you hand back the keys. That person doesn’t care how cool the bedroom stayed in July. They look at the frame, the paint, the gaskets and whether the sash still locks.
The kits themselves don’t help much. Depending on the brand, the box can include a slider panel, foam strips with a peel-off backing, screws for joining panel sections, and sometimes adhesive-backed hook-and-loop tape. Every one of those is described as temporary, and none of them tells you how it behaves after three months of sun on a south-facing sill.
There’s also a behavioral trap here. A small gap around the panel lets warm air back in, the renter feels it, and the reflex is to add tape. Then stronger tape. Each layer fixes a July problem and quietly raises the cost of September. Keep that chain in mind as you read the options below, because a lot of the damage I’ve seen starts there rather than with the kit as it came out of the box.
How We Judged Renter-Friendly Window Setups
I didn’t score cooling performance. That belongs in a device guide, and it would push every recommendation toward whatever seals tightest, which is often whatever sticks hardest. Instead, each method gets the same five questions, built on the way we evaluate every renter upgrade.
| Criterion | The question we asked |
|---|---|
| Permanent modification | Does it need drilling, screws or any change to the original window? |
| Adhesive exposure | Does adhesive touch the landlord’s frame or finish? |
| Removal | How easily does the setup come down? |
| Restoration | Is cleanup likely once it’s down? |
| Stability | Can it stay secure all summer without becoming permanent? |
One habit makes all five easier to answer honestly: photograph the window before you install anything. Close-ups of the jambs, the sill and the latch, in daylight. When you take the setup down in the fall, you’ll have something to compare against instead of a vague memory of what the frame looked like in May. Our move-in inspection checklist covers how to shoot those photos so they hold up later.
Removable Rigid Window Panel
Removable rigid slider panel
Deposit Risk: ModerateBest for: standard sliding and double-hung windows where a panel fits the opening properly.
This is the setup that ships with most portable units, and for a normal sliding window it’s one of the easier setups to reverse. The panel sits in the sash track, the hose adapter clips into a molded opening, and the whole assembly lifts out in one piece. In the simplest setups, there may be nothing to peel or scrape from the frame.
The useful distinction is where the modification happens. If the panel is too long, you trim the panel. Cutting a replaceable plastic insert is a very different thing from altering the window it sits in, and it’s the reason I’m comfortable recommending this route for most sliders.
Why moderate rather than low? Pressure. The sash rests against the panel all season, and on older painted frames or soft vinyl, that contact point can leave a mark. The window also can’t latch while the panel is in, so the lock sits unused for months. Check both when it comes out.
An oddly sized window can still push you toward trimming, extra foam or added support. If the foam strips in the box have an adhesive backing, stick them to the panel, not to the frame.
Check price on AmazonAdhesive Fabric Window Seal
Adhesive hook-and-loop fabric seal
Deposit Risk: HighSold for: casement, tilt and tilt-and-turn windows that can’t take a rigid slider panel.
These kits solve a real problem, which is why they sell so well. A casement window swings outward, so there’s no track for a panel to sit in. The fabric wraps the open sash, a zipper lets the hose pass through, and the whole thing attaches to the frame with adhesive-backed hook-and-loop strips. No drill, a few dollars, and it fits almost any opening.
The fabric comes down easily. The adhesive is the part that stays. Those strips spend the summer on a surface that heats up in direct sun and cools off at night, and how they release in the fall depends heavily on the frame’s finish and how long they’ve been bonded. It’s the same sun-loaded surface we flagged in our window film guide, just with a different product stuck to it. Some Amazon-origin user feedback describes the strips letting go too early, while other reports describe adhesive residue left on the frame after removal.
That number isn’t a verdict on the product, and it isn’t a count of unhappy buyers. What it does show is that installation is where the friction concentrates, and some Amazon-origin user feedback on these seals reports residue after removal. For a homeowner, residue is an annoyance. For a renter, it’s something to explain at the walkthrough.
If you have a casement window, skip ahead to the pressure-fit panel before buying one of these. If a fabric seal is truly your only route, read the removal section first and plan for cleanup from day one.
No affiliate link. We don’t earn from products we’re warning you about.
Pressure-Fit Foam Panel
Pressure-fit rigid foam panel
Deposit Risk: LowBest for: renters who want zero adhesive on the frame, including many casement and oddly sized openings.
Rigid foam board cut slightly oversized and pressed into the opening holds by compression. You trace the hose adapter, cut the hole, and slide the panel into place. Nothing bonds to the frame, and when summer ends it pulls straight out. If you cut it wrong, a replacement sheet costs very little.
It’s one of the most reversible options in this guide, and it asks more of you in exchange. A panel with no adhesive and no hardware stays put only because it’s sized accurately and the window holds it firmly. Measure the opening at the top, middle and bottom, since older frames are rarely square, and cut to the largest dimension.
Stability is the trade-off. A loose panel can shift, and a strong gust can push it in or out. The more reversible the setup, the more carefully it has to be fitted. Check it after the first windy day.
DIY material: use a rigid foam board sized for your actual window opening. No specific Amazon product is linked here because the board dimensions matter more than the brand.
Exhaust Hose Insulation Sleeve
Exhaust hose insulation sleeve
Deposit Risk: LowBest for: a supporting fix when the hose itself is throwing heat back into the room.
This one doesn’t seal anything. It’s here because of the tape reflex. The exhaust hose carries hot air, so it gets warm to the touch, and a renter who feels warmth near the window tends to blame the seal and reach for more adhesive. Often the heat is coming off the hose itself. A zip-on insulated sleeve deals with that directly and keeps the problem off the frame.
While you’re there, look at how the hose runs. A long, sagging hose can form a low point where moisture may collect, so keep the run short and supported. On humid days, check the panel and sill now and then for condensation too. Moisture forms wherever warm, humid air meets a cooler surface, a basic that Montana State University Extension lays out clearly. If the whole room runs damp, that’s a separate problem, and our dehumidifier guide covers it. A temporary setup still deserves an occasional look.
A sleeve won’t fix a badly sized panel, a loose hose adapter or large gaps. It removes one reason to overdo the tape, nothing more.
Check price on AmazonHow to Remove the Setup at the End of Summer
Most installation content stops once the unit is running. For a renter, the job ends when the window looks and works the way it did in spring. Give yourself an unhurried afternoon for this, not the night before a move.
- Photograph the setup before touching it. Capture where the adhesive sits, how the panel is arranged, the hose connection and the frame’s current condition. Put these next to your install-day photos.
- Take out the hose and mechanical parts first. Disconnect the hose, then lift out rigid or foam panels, clamps and any removable brackets. This takes the tension off the opening before you deal with anything stuck to the frame.
- Treat adhesive as a surface problem. Painted wood, vinyl, aluminum and factory coatings all react differently, so there’s no universal solvent or scraping method. Follow the adhesive maker’s removal instructions where they exist, and test any cleaning method on a small, hidden spot first.
- Inspect the window, then close it. Look for residue in corners and sun-exposed sections, then check gaskets, weather stripping, handles and the latch. Open and close the sash a few times. The question to answer: does it work and look substantially as it did before installation?
Which Setup Fits Your Window?
Start with the window, not the product. Once you know what you’re working with, the choice narrows quickly.
| Method | Drilling | Adhesive on original frame | Removal difficulty | Main renter concern |
|---|---|---|---|---|
| Removable rigid panel | Usually no | Low / optional | Low | Fit, sash pressure |
| Adhesive fabric seal | No | Yes | Medium | Residue |
| Pressure-fit foam panel | No | No | Low | Stability |
| Heavy tape DIY setup | No | High | High | Cleanup, residue |
Think back to that gray ribbon on the jamb. Nobody set out to leave it there. It came from a setup that was judged on installation day and never on removal day. Plan for both, and the window goes back to the landlord looking the way you found it.