Peel and Stick Floor Tile for Renters: The Part That Costs You Is Taking It Up
This article contains affiliate links. If you buy through them, I earn a small commission at no extra cost to you. It doesn’t change which products get recommended, or which ones get left off the list.
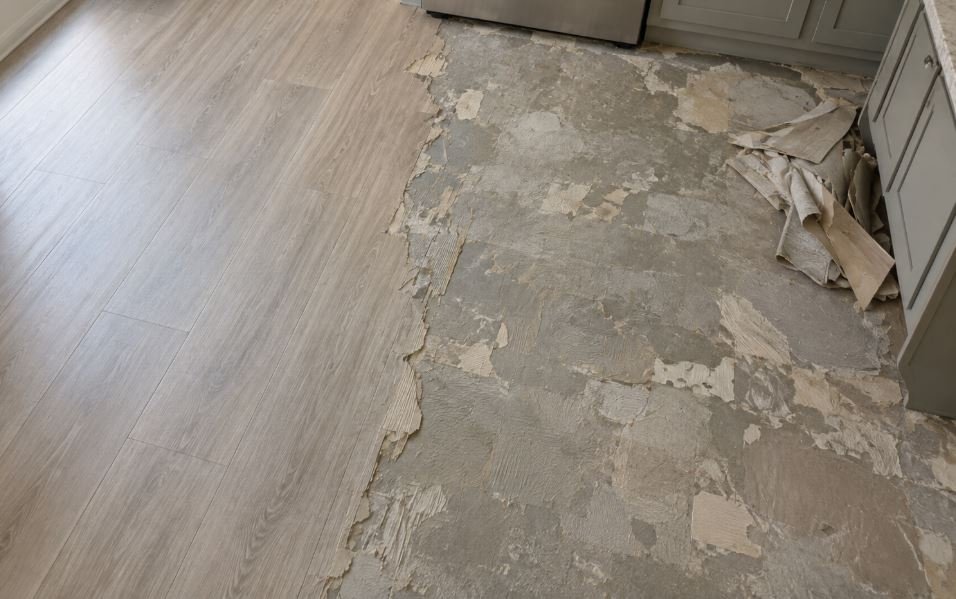
The kitchen was half done. Maybe forty tiles pulled up and stacked against the wall by the door, another sixty still stuck down, and a ragged border between them where somebody had run out of patience. Under the pulled-up section the old sheet vinyl had come away in patches, leaving grey adhesive shadows and a few strips of backing paper welded to the subfloor. The tenant had started on a Sunday, worked for two hours, and left.
That floor cost more than the tiles ever saved. This is the thing about peel and stick floor tile for renters that nobody puts in the product photos: the tile goes down in an afternoon and comes up over a weekend that turns into a decision to stop. A landlord can live with an ugly original floor. Nobody can live with half of one.
I want to be fair to the product first, because it works. A bad rental kitchen floor is genuinely demoralizing, and a box of vinyl tile fixes it cheaply and fast. The problem here isn’t that the product fails. It’s that it succeeds — and the better it sticks, the worse the ending.
What Is Peel and Stick Floor Tile for Renters?
Peel and stick floor tile for renters is self-adhesive vinyl tile applied directly over an existing floor without glue, grout, or fasteners. Each tile carries a pressure-sensitive adhesive backing that bonds when you press it down. The renter-relevant distinction is between adhesive tile and loose-lay vinyl, which uses weight and friction instead of glue. Adhesive tile holds better and looks tidier at the edges; loose-lay comes back up. For a deposit, that second property matters more than the first.
The Adhesive Gets Stronger While You Live There
Pressure-sensitive adhesive is at its weakest the moment you set the tile down. Every day after that, it gets better at its job. Foot traffic presses it into the texture of the surface underneath. Warm afternoons soften it slightly and let it flow into pores and scratches. Furniture holds a steady load over one spot for months. None of this is a defect — it’s the whole design.
So a tile lifted in month three peels off with a putty knife and a bit of swearing. The same tile in month thirty-six brings part of the floor with it.
I want to separate this carefully from a mechanism I’ve written about before, because they sound alike and aren’t. Elsewhere on this site the damage accumulates through neglect — something goes unnoticed, unemptied, unchecked, and the cost builds while nobody’s looking. Here, nothing is being neglected. You installed the tile correctly, you cleaned it, you did everything the box asked. The bond deepens because you did it right. There’s no maintenance step you skipped, no warning sign you missed, and no version of the next three years where the adhesive is easier to remove than it was on day one.
Nobody Checks What’s Underneath
Here’s where most of the real variance lives. The tile is the same in every apartment. The floor it lands on isn’t, and that floor decides the outcome.
Over sheet vinyl, the adhesive bonds beautifully with the wear layer — which is exactly the problem, because the wear layer is the part that lifts. Over painted concrete, it takes the paint. Over sealed or waxed wood, it takes the finish and leaves a matte rectangle grid you can read from across the room. Over existing ceramic tile, and only there, it usually comes off clean and leaves residue you can dissolve.
The product page doesn’t ask you any of this. It says “apply to a smooth, clean, dry surface,” and that sentence is indifferent to what the surface is made of. Smooth, clean, and dry describes a painted concrete slab and a glazed ceramic floor equally well, and those two produce completely different move-out days. So the decision gets made before you choose a tile, by identifying the floor you already have. If you’re in an older building, ask the management office before you disturb the existing floor at all — not for advice on the tile, just to confirm they’re fine with anything going over it.
Edges and wet spots
One more thing on the layer question, briefly. Seams take on water at the predictable places — in front of the sink, at the dishwasher’s kick plate, at the bathroom threshold — and water that gets under a tile stays there. It isn’t sitting on a surface you can wipe. It’s trapped between two layers, softening the adhesive in some spots and swelling the material underneath in others, and you won’t see any of it until the tile comes up. Seal the perimeter and thresholds properly and this mostly goes away.
The Damage Happens on the Way Out
Everything above is buildup. The charge itself gets created in about ninety minutes on moving day.
You start at a corner with a scraper. The first few tiles fight you, and one of them tears rather than lifts. Now you’re working the pieces, and the scraper skates and gouges. Two hours in, you’ve done a third of the room, your hands hurt, the truck is booked for tomorrow, and the floor you’ve exposed looks worse than the one you covered. So you stop, put a rug over the seam, and hope.
That’s the scenario the deposit gets spent on. Not the tile, not the adhesive, not the residue on its own — the abandoned middle. An untouched bad floor is a floor the landlord can leave alone until it’s convenient. A floor that’s forty percent stripped, patchily glued, and gouged along the seam line has to be replaced entirely, and it has to be replaced now, before the next tenant. The invoice for a full kitchen floor lands on the person who made the floor un-leaveable.
The corner test: one tile, one week
Every other test on this site checks whether a product fits your apartment. This one checks whether it comes out again — and you run it before you cover anything.
- Identify the surface you’d be covering. Sheet vinyl, painted concrete, sealed wood, or ceramic? If you can’t tell, look under a cabinet toe-kick or behind the fridge, where the original material usually sits uncut.
- Stick one tile somewhere invisible and leave it a week. Behind the refrigerator, inside a pantry, under the sink. One week is the minimum for the adhesive to start doing what it does. This single tile is the only real data you’ll ever get about your specific floor.
- When you lift it, look at the floor — not at the tile. A torn tile means nothing. Residue, dulling, a lifted fiber of vinyl, or a color difference where the tile sat means you have your answer.
- Be honest about how long you’ll be there, including the part you don’t know. A one-year lease, a two-year plan, and a genuinely open-ended reality are three different things. Decide against the uncertainty, not against the optimistic version.
I’d normally tell you what happens next, and here I can’t. This one depends on which reader you are. Somebody who moves out at fourteen months lifts these tiles cleanly and thinks I overstated the whole thing. Somebody who’s still there in year four can’t lift them at all, and the same product, applied the same way, costs them a floor. I don’t know which of you is reading, and here’s the harder part — neither do you. Nobody signs a lease planning to stay three years. They just do.
Comparing the Options by Deposit Risk
| Option | Deposit Risk | Removal at 12 months | Removal at 36 months | Best for |
|---|---|---|---|---|
| Loose-lay vinyl tile or roll | Low | Lifts by hand | Lifts by hand | Almost everyone |
| Adhesive tile, 2mm+ | Moderate | Usually clean, some residue | Takes the layer below | Ceramic subfloor, short stay |
| Adhesive tile, thin/budget | High | Tears into pieces | Partial strip, full replacement | Nothing, honestly |
| Area rug or runner | Low | Roll it up | Roll it up | Covering one bad zone |
| Leaving the floor alone | Low | — | — | Ugly but original floors |
Does Peel and Stick Flooring Damage the Floor Underneath?
It can, and the risk rises with time rather than with wear. Over ceramic tile, adhesive vinyl usually lifts cleanly within the first year or two. Over sheet vinyl, painted concrete, or sealed wood, the adhesive bonds into the existing surface and removal pulls up finish, paint, or the vinyl wear layer — most reliably after two to three years in place. Thin budget tiles make this worse because they tear during removal instead of lifting whole. Loose-lay vinyl avoids the mechanism entirely.
What I’d Put on the Floor
1. Loose-lay vinyl tile or roll
Deposit Risk: LowPicture the same moving day from the top of this article, except the tenant starts in the corner and the whole floor is in a stack by the door in twenty minutes, with nothing underneath it but the floor that was always there. That’s the entire argument for this category, and it’s a strong enough one that I’d rather you stopped reading here and bought this.
Loose-lay vinyl stays put through sheer mass and a high-friction backing. It’s heavier and thicker than adhesive tile, it lies flat in a room with any furniture in it at all, and it doesn’t care how long you stay — month forty is the same as month one because there’s no chemistry happening. The trade-offs are real: it costs more per square foot, the edges want a little help in doorways and high-traffic runs, and in a very small room with no furniture, a piece can shift. Those are inconveniences, and they’re the kind you notice for a week and then stop thinking about. The adhesive version’s trade-off arrives once, at the end, as a bill.
No link here yet, on purpose. Search results for “loose lay vinyl” on Amazon are full of products that are actually peel-and-stick, and I’m not sending you to one of those by accident. Check the listing yourself for the words no adhesive or glueless, and for a stated backing type — if it mentions a peel-off liner, it’s the wrong product.
2. Adhesive vinyl tile, 2mm or thicker
Deposit Risk: ModerateThis is the product most people came here searching for, and I’m rating it Moderate rather than Low because of the removal curve, not because of anything wrong with the tile itself. It installs cleanly, it survives a dropped pan, and a thick tile has a real chance of lifting in one piece — which is the single most important property a tile can have on the day you leave.
Buy it if two things are true: your corner test came back clean, and you’re on a short, defined stay. Ceramic subfloor plus a one-year lease is a reasonable place for this product. Sheet vinyl plus an open-ended stay isn’t, and no amount of careful installation changes that. If the listing doesn’t state a thickness in millimeters, skip that listing — thickness is the variable that decides whether you’re removing tiles or scraping fragments.
3. Removable floor tape or edge strips
Deposit Risk: LowRun this around the perimeter and across doorways to hold loose-lay down where it wants to travel. It fixes the one genuine weakness of option 1 for a few dollars. Check that the tape is rated for removal from your surface type before you use it on anything but the loose-lay itself.
4. Citrus-based adhesive residue remover
Deposit Risk: LowBuy this on the same day you buy the tile, and put it in the closet with the tile box. That’s the actual instruction, and it sounds silly until you consider what you’re doing in three years: standing on a floor you need to clear by tomorrow morning, trying to remember the name of a product you read about once.
Citrus solvents break the adhesive bond without the aggression of acetone, which matters because you’ll be using it on the surface you’re trying to protect. Don’t assume it’s safe on whatever finish you have. Test it in the same hidden corner you used for the tile test, give it a few minutes, and check for dulling or color change before you take it anywhere visible.
5. Area rug or anti-fatigue kitchen mat
Deposit Risk: LowA lot of bad rental floors are only bad in one place — a scorched patch in front of the oven, a stained run by the sink, a section where the pattern gave up. Covering that one zone with a washable rug solves the visible problem for a fraction of the money and leaves the floor untouched underneath. For a decent number of readers this is the correct answer, and I’d rather say so than sell you a box of tile you’ll regret at 6 a.m. on moving day.
6. Cheap thin adhesive tile with no stated thickness
No linkA thin tile and a thick tile fail differently, and the difference is the whole reason this card exists. A 2mm tile has enough structure to transmit force from the edge across the whole piece, so when you pry a corner, the tile lifts as a unit. A thin tile doesn’t. Force applied at the corner tears the corner off, and you spend the next two hours removing a floor in fragments the size of a playing card.
These are the cheapest listings per square foot on Amazon, they dominate the first page of results, and the listing photos are noticeably better than the material. Thickness is usually absent from the specs entirely, which by itself tells you where it falls in the range. On the floor, a thin tile also telegraphs every imperfection underneath it and lifts at the edges — and a lifted edge is both a trip point and the way water gets in.
So no affiliate link on this one. This product is the most efficient generator of the exact outcome this article is about: the half-stripped floor. If the price is what’s drawing you here, the honest move is a smaller area covered with option 5, or a partial run of option 1. Covering less floor for the same money is a worse-looking outcome than covering all of it, and a much cheaper one at the end.
If You’re Doing It Anyway
- Photograph the existing floor before you cover it. Corners, thresholds, under the cabinet overhang. If you documented the place at move-in, this is the same habit — see the move-in inspection checklist for how the photos should be framed and dated.
- Write down what the surface is. Vinyl, concrete, wood, ceramic. Keep the note with the photos. Future you will want it.
- Run the one-tile corner test in a hidden spot and give it a full week before you commit to the room.
- Buy the residue remover on installation day and store it with the leftover tiles.
- Leave thresholds and the perimeter sealed, not open. Open seams at the door and along the sink wall are where water gets between the layers.
- Put spreaders under heavy furniture legs. Concentrated load presses the adhesive harder at that point, and the bond there ends up stronger than anywhere else in the room.
- On removal, lift one tile and stop. Look at what’s underneath before you commit to the second one. If the surface is coming up with the tile, that’s the moment to stop and think — not forty tiles later.
- Don’t leave removal for the last day. The whole failure mode in this article is a person running out of time, not a person running out of skill.
The adhesive behavior here is close cousin to what happens on walls, and if you’re weighing both projects at once, the peel-and-stick wallpaper guide covers how the same class of product behaves on a vertical surface.
No adhesive means no removal problem, at any point.
Only after a clean corner test.
Covers the bad zone, changes nothing underneath.
Tears on removal, which is the expensive failure.
The word “removable” isn’t a specification
Listings in this category say easily removable, damage-free, renter friendly. None of them says removable after how long, from what surface, or leaving what behind. There’s no test standard behind the word and no number attached to it, so it can’t be wrong and it can’t be verified. Treat it the way you’d treat “comfortable” on a mattress listing — a description of intent, not a property of the product. Your one-week corner test produces more usable information than every removability claim on the page combined.
The tenant who left that kitchen half finished didn’t do anything careless. They picked a product marketed for exactly their situation, installed it properly, lived on it for three years, and started taking it up with a reasonable amount of time budgeted. Every step was defensible. The only thing they got wrong was assuming that the day they put it down and the day they took it up would be symmetrical.
They aren’t, and they were never going to be. Buy the floor you can leave.
SaveTheDeposit is a participant in the Amazon Services LLC Associates Program, an affiliate advertising program. As an Amazon Associate we earn from qualifying purchases.
Dana Whitfield writes SaveTheDeposit’s product guides. Her background is in apartment property management in Ohio and North Carolina, and the scenarios in these articles are composites drawn from common move-out inspection findings rather than accounts of specific units or tenants. Product guidance is based on specifications, listings, and user reports, not hands-on testing. Images are AI-generated.